Wednesday, April 3, 2013

Baked Stuffed Avocado with Quinoa

Hi.  My name is Debi and I love avocado.  Okay, more than love.  I'm borderline obsessed with it.  Look, I didn't start eating avocado until I was 35 (that was last year) so I have a lot to make up for!!  You get it, right??

Two weeks ago I made fried avocado (which was pretty amazing, by the way).  If I can fry it, I can bake it...that would make sense, yes?  I tried it and it was flippin' fantastic!!  It's a winner, folks.

Yum, Yummo, Yummy, Yum.

This serves 1 person since I dined alone (ah...peace & quiet with my avocado and a beer).  

1 whole avocado
1/4 cup quinoa, cooked
1/4 cup no salt tomato sauce
1/4 cup diced yellow pepper
1/4 cup diced red onion
Scant teaspoon Trader Joe's taco seasoning
1-2T goat cheese

Preheat oven to 375.  Cook quinoa according to package.  I made 1/4 cup.  After removing it from the heat, I added the tomato sauce, diced veggies and spices.  Stir to combine and cover in pot...let sit for 5 minutes.  While that's hanging out, slice your avocado lengthwise and remove pit.  Score the avocado meat horizontally & vertically (see pic below).  Carefully scoop out the chunks but leave some avocado meat in the skin - trust me!  Add the scooped out avocado chunks to the quinoa mixture and gently stir.  Sprinkle in the goat cheese.  Add the mixture to the hollowed out avocado halves and place in a shallow baking pan.  Heat for about 15 minutes in oven.  That's it!!

Because the Trader Joe's taco seasoning packs some serious heat, I highly recommend serving this with an ice cold beer or margarita.   Again, trust me...It's a perfect combo!!


The ingredients - pretty simple!

Slice avocado lengthwise and remove pit

Score each half horizontally and vertically, then scoop out gently

Leave some avocado in the halves, add the scooped out cubes to a bowl
Add tomato paste, veggies & spices to the cooked quinoa and let sit
add diced avocado and sprinkle of goat cheese, mix gently
bake avocado for 15 minutes at 375
PERFECT with a cold Bud Light Lime!!
One half down...onto the other half!

Monday, April 1, 2013

Fit & Healthy Baked Oatmeal Bowl

Hey fit friends!!  Although I know it's really not the best time to grab my phone and plug into the digital world (i.e. fill my brain with social media mush), I often open Instagram before I get out of bed.  It's kind of my wake-up routine.  Open eyes, pick up phone, check email, check Instagram...and occasionally check Facebook.  Yeah...

As I was scrolling this morning, I saw a picture of someone's breakfast - baked oats.  It looked fantastic!!  I can't remember who's post it was (if it was yours, please comment and share your page) because it didn't really sink in just how good that breakfast would be until a few hours later, post-workout.  As my heart rate was dropping back to normal after an hour of ChaLEAN Extreme and TurboFire (Day 1 of my 90 day hybrid workout), I started thinking about food.  And the oats kept creeping back into my belly.  Er...into my mind.


I figured I'd just make my standard Overnight Oats recipe and, well...toss it in the oven.  Pretty much fool proof.  Preheat oven to 375.  I used a nonstick ceramic ramekin and didn't need to spray or grease it.  In a small mixing bowl add the following:

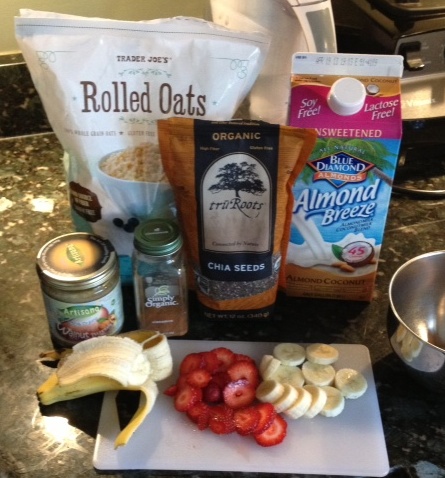
1/3 cup gluten free rolled oats (I like Trader Joe's brand)
1T chia seed
sprinkle of cinnamon
sprinkle of Himalayan sea salt
1/2 small banana, sliced
4 small strawberries, sliced
1-2T raw nut butter of your choice (I used walnut/cashew)

Add all, except fruit & nut butter, to mixing bowl and cover with unsweetened vanilla coconut or coconut/almond milk and stir to combine.  Add to ramekin and then layer the sliced banana and strawberries.  I added the walnut butter in the center instead of stirring to combine it.  Bake at 375 for 25 minutes.

This could be made so many ways!!  I think tomorrow I might try it with organic pumpkin and fresh organic blueberries, and in place of the nut butter, use raw slivered almonds.  Decisions!!  If you make it, please share and tag me on Instagram (@FitHealthyMommy) or Facebook (Fit & Healthy Mommy) - Please like and follow me as well!


Simple, short list of ingredients
Fruit - it's a tiny cutting board - it wasn't that much fruit!
Before baking
After baking
A spoonful of Yummy Goodness


Tuesday, March 19, 2013

Healthy (er) Pumpkin Chocolate Chip Muffins


Hey Fit & Healthy Friends & Family!!!  Several people have asked me to share my healthy (okay, healthier than some others) pumpkin chocolate chip muffin recipe…so, here you are friends!!  I apologize in advance for my lack of pictures.  I was using my iPhone and not expecting at the time to be posting this on my blog.


I’ll start by saying that I had a sick little pumpkin home with me yesterday and she was helping me to bake.  See the third photo below and you’ll know why I don’t bake with my kids that often.  Okay…and there’s the fact that I’m really not a very good baker.  Measuring…not my style.  And I won’t mention the mess I always make all over my kitchen.  Back to that third photo, I’m not responsible for that mess, just for the record.

I thought it would be fun to channel the flavors of fall because it was a dreary, chilly day.  I know it's still March and there's that whole "in like a lion" nonsense...but it was the 18th.  Come on now!!  I'm ready for the lamb!

Three happy little girls!


Since Take One of muffin making (banana muffins) did not pan out (haha!), I opted for Take Two…and use up what I could from the ingredients I still had in the pantry.  Since I had used up most of the whole wheat pastry flour in Take One, I had to substitute in this recipe.  This recipe makes 24 muffins.  You could halve everything to make 12.


Ingredients:
2 cups whole wheat pastry flour
1 cup plus a few tablespoons brown rice flour
4 eggs (use farm fresh, organic, cage-free)
1 ¼ cups Turbinado (or coconut sugar)
1 tsp baking powder
1 tsp baking soda
1 tsp Himalayan sea salt
1 tsp cinnamon
1 tsp pumpkin pie spice
1 tsp pure vanilla extract
¾ can organic pumpkin puree (NOT pumpkin pie filling)
2/3 cup natural applesauce (sugar free)
½ cup mini dark chocolate or semi-sweet chocolate chips
Splash of coconut or almond milk


Preheat oven to 350.  Grease or spray 2 muffin tins (this recipe makes 24 muffins) or use paper cups to line muffin trays.  I always opt for greasing (coconut oil works well here!) because I think it makes the muffins a little more moist.  But, remember I’m not a baker so do what you think is best.  Combine all dry ingredients except chocolate chips & milk in a large mixing bowl.  In smaller bowl, whisk the eggs.  Add the pumpkin, vanilla & applesauce and mix with the eggs.  Slowly add the wet mixture to the dry ingredients.

Gently mix until all ingredients are incorporated but try not to overmix.  If your batter seems dry (like mine did…I think in part due to the brown rice flour addition), add a splash of coconut milk to reach your desired consistency.  Finally, stir in the chocolate chips.  I opted for sparse chips.  You can certainly add more for a more chocolatey pumpkin muffin, but I figure my girls get enough chocolate and sugar as it is.
 

Spoon the batter into your muffin tins and bake at 350 for about 30 minutes.  Start checking at 25 minutes (a toothpick inserted into the center of the muffin should come out clean when the muffins are done).  I cooked mine 30 minutes but felt they would have been more moist if I took them out sooner.  That could have also been the brown rice flour.  If you use all whole wheat pastry flour, you might have to tweak the baking time, but I’d still check it starting at 25 minutes.
 

If you choose to make this recipe, please post here and let me know what you think!  Also, if you use substitutions or alternate ingredients, share too.  You could add walnuts, flax, chia, cranberries, all sorts of stuff!!  Try it!


After baking - they were dense but the kids loved them!

Take One - Ashelyn had trouble with the stirring when gravity kicked in.

Monday, March 4, 2013

Fit Mom Monday - Guest Blogger: Shenade F.

Good evening Fit Friends!  Happy Fit Mom Monday!  I am excited to feature a fun, hip, beautiful expecting mama on my blog tonight.  Meet Shenade.


Shenny lives in the Edmonton area of Alberta, Canada.  She has a fur baby named Bingo and is due with her first baby, a boy, due in early May.  Wanting to have a Fit & Healthy pregnancy, Shenny is focusing on clean eating with the support of her husband.  Together they have forged an amazing foundation of health & wellness for their family.

Here's what Shenade shared with us...


·      What are your current fitness & nutritional practices?


Both my husband and I live by the practice of eating whole foods.  No processed foods, limited sugar and fat, lots of vegetables and healthy proteins.  We also were working out together before I got pregnant 4 days/week at the gym doing both cardio and weight training. 


Of course since I’ve been pregnant, my practices have slacked off a bit due to cravings for chocolate and other sugary things.  Also, I have no energy to exercise!  However, I still keep the diet/lifestyle principles in mind and as soon as our baby is born, my husband and I already have a plan to get right back at it!


·      Do you have any tips you’d like to share?


Do a liver cleanse once/year! This helped me tremendously as apparently I had a congested liver which impaired my ability to lose weight.  If your body is not functioning properly, living a healthy lifestyle won’t benefit you much.  Now that all my organs are clean and working properly, I have more energy than I ever have and am able to see the benefits of living a healthy lifestyle.


Don’t drink diet pop!  I was a diet pop addict pretty much since I was a kid. After finding out my liver was congested and one of the main reasons was because of all the diet pop I drank, I realized how much better I feel after cleansing my system (I had to do 2 cleanses which is how bad my liver was).


Water, water and more water!  Drink at least 3+ liters a day as it flushes out your system and keeps everything moving and working properly.  It also is awesome for your skin and great for keeping you hydrated!


     Limit or eliminate processed foods! Anything that comes in a package of some sort is processed.  Processed foods increase your insulin levels which trigger your body to convert these calories into sugar (you don’t want this).  Eating whole foods consisting of lots of vegetables, fruits (low glycemic index fruits and vegetables), limiting dairy (your body does not need dairy and in fact functions much better without it) and eating only complex carbs will help you feel better, lose weight and see accomplishments from all of your hard work!

More of Shenny's story...


I have struggled with weight my whole life.  I have polycystic ovarian syndrome, am hypothyroid and also have a parathyroid issue where my body does not absorb vitamin D or calcium. I was also told I could not have kids because of all my ailments.  In 2010, I was sick of feeling crappy all the time, wanted to get pregnant and thought that if maybe I got down to a healthy weight that I would finally feel better and would be able to conceive.  I finally decided to research diets and programs that would work for me.  I had tried everything from Weight Watchers to the Atkins diet and NOTHING worked. Along with those diets, I exercised 2.5 hours a day 5+ days a week.  My weight would just not budge!


I was finally able to drop the weight by eliminating sugar and fat from my diet, limiting carbs to a bare minimum and increasing my vegetable intake.  I also started taking Vitamins B6 and  B12 and I believe these were the vitamins my body was missing because as soon as I started taking them, my weight loss stall disappeared!  By June of 2010 I had lost 63 lbs!  I continued on with this diet and new lifestyle and by April 2011 I was down 90 lbs.  On July 26, 2012, I finally conceived and am due to have a baby boy May 2, 2013!

And - here's a fantastic recipe from Shenade: 

Almond Crusted Chicken Breast

Ingredients

2 or more boneless-skinless chicken or turkey breasts
Salt & Pepper
Pinch of cayenne
1/4 cup roasted, unsalted almonds (ground in food processor)
1 small garlic clove
4 tsp extra-virgin olive oil

Directions
Preheat oven to 425˚F. Season chicken or turkey breast with salt, pepper and cayenne. Place on aluminum foil lined sheet pan.

In a food processor, mini-chopper, or blender make a coarse paste of the almonds, garlic and oil. Top each chicken breast with half mixture pressing down slightly to adhere.

Roast for 15 to 18 minutes or until cooked through.
Serve with a side of whole grain brown rice and some asparagus for a complete delicious meal!
Related Posts with Thumbnails